Your First Car
Beginner Tutorial
So you want to build a car (or truck). Here is a quick and simple way to get you started.
First off, you'll need Pipes. Personally, i prefer the adjustable pipes for the main reason that you can always come back and adjust their length and/or node position. This allows you to quickly build a working prototype and then be able to fine-tune the location of the various components. Whether you use a straight or curved adjustable pipe is more of an aesthetic thing.
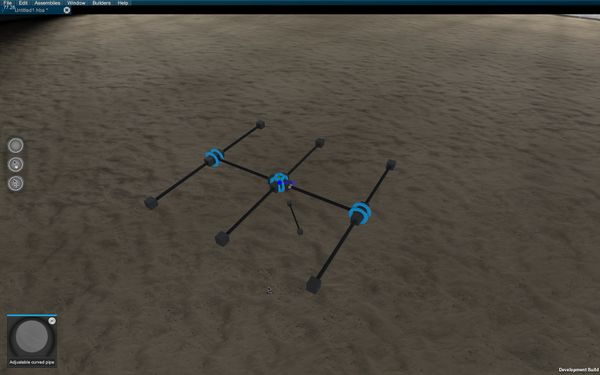
Ok, so make sure you are in weld mode by clicking on the Weld Tool the top circular icon on the left of the screen, spawn a pipe and select one of it's end faces, it will become white and an audible click should be heard. Now that you've selected your pipe, holding down the shift key, click on the origin cubes faces where you want your pipes to be welded. Keep adding pipes until it looks like the following image.
Note where the white arrow points out of the origin cube, this indicates the front of your vehicle. It is important that your vehicle is built in the right direction for wheels to work correctly later.
So now that you have a basic chassis, you can add wheels to it. Spawn and add a wheel on each end of the 4 outer pipes.
Once that is done, go to into select mode by clicking on the Select Tool, the middle circular icon at the left of the screen. Click on any of the Wheel Hub. The part should be white when properly selected. You can also double-click on a wheel to have all the wheels selected. At this point the actual wheels should show up and you will see a red arrow for each wheel.
Rotate the wheels, if needed, so that those red arrows are under the wheels, where the ground would be. At this point you will notice that wheels on one side point one direction and wheels on the other side point in the opposite direction.
You want those red arrows to be under the wheel and pointing forward, the same direction as the origin cube's arrow. Select the 2 wheels pointing backwards and in their properties, set them to =LeftWheel=.
While in the wheel's properties page, you can also select the type of wheel you want and it's size.
Now add a Seat so you can control this fine vehicle you are building. In this example, I'll be using a Bucket Seat and a Passenger Bucket Seat. Add a seat on each of the middle pipes.
At this stage you can play around with the adjustable pipes and adjust the proportions of your vehicle.
The final components you will need for a working car will depend what engines you'd like to use.
If you decide to go electric, you will need Electric Motors and as many Batteries as you want/need to power them. For gas engines, you will need to add a Fuel Tank and have at least one battery to power the engine. You can also connect a Transmission to any engine using driveshafts. You can use a 5 Speed Transmissionor just a Single Gear one depending on your needs. You don't actually need a transmission but it will surely be very useful, even if only for adjusting the final ratio or reversing the direction in some cases.
For this example I'll be using a Falcon gas engine (inline6) with a 5speed transmission. I've also added a fuel tank,
...and a 12V battery on each seat, because of symmetry
That's it! Well, not IT it, but for this part.
Now you need to connect all these things so they can work together. For many, this is the fun part, but
for some it can feel like a chore. First step is going into the Tuner mode.
Once there you will be greeted with a pile of shh-parts all stacked on top of each other.
Little piece of advise here, this is where all parts will spawn in the tuner, so move parts away from there
and don't build circuits in this area so you can see new parts when you add them later on.
First thing is to move those windows and sort them by function so you can see more clearly what's going on. How you arrange them is a personal preference.
I will not go through the specifics of connecting various parts together in this tutorial, but i will show you the general connections, most are pretty simple and color-coded to make it even more obvious.
The final part is the configuration of the various seat outputs depending on your controller and general preferences.
Now save and exit the builder to try out your new creation !


